|
My video is now completed and edited down to 1:34 seconds (6 seconds dedicated to my logo, crediting work, and acknowledgements to Adobe Spark and Touro/Napa Learns). I had to re-record one of my slides because I noticed some static and realized that my sore throat made me sound different and less upbeat than the slide before and after so I spent (more like wasted) so much time recording my voice over for the slide. I am happy with the end product but am still thinking about some of the images that I used, wondering if I should take my own pictures of my classroom.
My poster is not yet started and I feel overwhelmed about having to condense my 38 page research paper, for most was less than 20 pages. I need to add problem, background, need, and literature but still highlight my research methodology, results, and conclusions while trying to add in my second round of research. I think I just need to dive into it and some kind of divine inspiration will come to me, hopefully! I have just finished the stage in which I chose my background colors and font themes. Now it's time for the real work! I don't have anything to show but wish there was more time so that I could get a critical friend to review what I've got once I've got it.
0 Comments
Successes and Frustrations
For my capstone project video, I already have my B-roll in mind and am very happy with my script. The problem with my B-roll is that it is difficult to find stock photos that fit my vision. Therefore, I will probably need to create my own photos and images. I do have a DSLR camera and my cell phone camera is pretty good so I am hopeful that I will be able to produce some good quality photographs and/or video clips but I have yet to experiment. For one of my scenes in which I pan across a classroom with students holding up signs, there is a lot of preparation and planning needed to create something of high quality. I will need to create the signs, think about the classroom layout and whether it will provide the best angle, and experiment with lighting. I will also need to enlist the help of my classes which means I have to take time out of my teaching to do this. In terms of my script, the content is good but I want to make sure that what I am saying has a big impact and will interest potential listeners. My script goes slightly over 90 seconds so I need to cut down some of the language. I already know what I would like to take out or rephrase so I feel pretty confident about my script. I was reading at a slightly quicker pace than I had wanted to so I would like to record it and play it back to listen for any necessary changes which in turn will help me improve my script. I Wonders I would really rather not have a live video clip of me because personally, I am not looking to create a documentary-esque type video. Hence, I am hesitant about inserting a clip of me sitting there reciting lines from a script about the benefits of personalized learning. Who am I and what is my presence going to do for my video? I do not know what effect that would render my video and if it would be a positive or negative thing. Rather than me, I would like to include video clips of classroom engagement and blended learning and I am wondering if I can take clips from videos posted on Edutopia and other educational websites. It would be a pain to stage these clips with my class, it would take time out of learning, and I do not have much extra time to do this before the presentation comes up. On another note, I would of course credit the owners of said video clips I would be using but overall, I do not know if it is frowned upon to add video clips. Most of the time we add stock photos and credit the owners so I wonder if this applies to video clips too. Next Steps In conclusion, I am planning to add my b-roll images, short video clips, words that appear on the screen, my voice over, and background music to create my 90 second video. I will need to create b-roll images that I cannot find stock photos of and I still need to grab video clips if allowed.  Process In my journey in script writing, first, I listed out each component that would go into my video. I introduced problem and need briefly in various contexts, some statistical data as evidence, the objective of my capstone, key features and components of capstone providing information about personalized learning, and why students and educators should visit my capstone, describing the benefits of implementing personalized learning with the use of digital tools. Second, I make sure that the sentences in the script are concise but impactful. This ensures that when my images pop up on screen that the script flows smoothly with the image and transitions at a good pace rather than having really long sentences for each image. Third, I wrote a short blurb about what kind of B-Roll image(s) or video(s) I could use for each of the components such as an image of students holding cards up that indicates whether they are meeting proficiency or not in red and green that pans across the whole class or a graph/table or image of the statistics and so on. Fourth, I time myself reading the script to make sure that it will only be 90 seconds long and make any changes necessary.  Challenges In producing my capstone project video script, I found out that I had to become a more concise writer especially if I am limited to 200 words or the equivalent of a 90 second video. I struggled with what information was relevant and necessary versus what was extraneous, redundant, or could be information I add to my other pages on my capstone. My problem is I always have too much to say and I need a second pair of eyes to tell me what I can cut out because in my eyes, I feel like my intentions or message may be unclear if I cut out anything. I also learned that for the objective of this video, it is better to use less flowery language and be more direct so that my writing is more concise and not unnecessarily wordy but my meaning is still understood. For the problems I encountered, I used the critical friends protocol where I ask someone to proofread my work and give me constructive feedback. Getting that outside perspective is very important for improvement because I know very well what my intentions are in my head, it is hard to tell if my work is reflecting what is already in my head. In the end, I asked my boyfriend for his advice, continuously proofread my stuff, and did a lot of revisions, editing, and omissions.  Video Editor
In the end I chose to use none of the suggested video editors. I will be using Adobe Spark because I am already familiar with the features of it and how to navigate. The video you download is also in the right format. One of my favorite features of Adobe Sparks is that it allows me to record and re-record each slide separately as many times as I want so I do not have to record everything in one take. I remember creating my 8 minute 30 second video about critical thinking for one of the classes and I had to record everything in one take and if I messed up, I had to record it all over again. At the end of it my voice and throat were shot. You can upload images that you want as well as any videos you want and it gives you music tracks to choose from. I will be using different image editors to create B-Roll images for my video. I like to use MS Paint, Canva, Logomakr, and even MS PowerPoint for editing images.  Logomakr Review In creating my logo, I experimented and ended up choosing to use Logomakr. There were a few pros and cons, but more pros. I think the ease and simplicity of the tool really appealed to me and there is also a way to get a low quality version of it for free just by crediting the website. High quality versions are also available and are just $19 which is comparable to many of the other logo makers around.  Pros First, I will discuss the pros. The Logomakr website is very user friendly and offers up a large range of graphics to choose from. There is also a wide range of fonts and styles in terms of choosing text. Users can choose to change the color of any graphic or text simply by dragging the cursor over the color the user want and customize it to be brighter, darker, and so on. Users can also rotate, reflect, stretch, or squeeze graphic and fonts by clicking and dragging. There is a feature that allows the user to see grid lines for easy alignment of graphics and texts when dragging the item around, the lines will appear. Other general features include shapes, paint bucket, undo, trash, and cropping. Finally, there is a FAQ page, video tutorial, and a professional custom logo option starting $195 or $299 for UNLIMITED revisions which would normally cost thousands of dollars.  Cons and Loopholes There were a few cons. First, font sizes are not numbered such as size 24 font. Users may drag the corner of a text or graphic to enlarge or decrease the font size but size is generally measured and given in pixel height and width. This may be a given for graphic designers but every time the user wants to add new text and match the original size, they would have to match the pixel height of the original. The loophole around that is to highlight the text box, copy, paste, and edit the text. Changing the color of an item is easy enough but to change each item to the same color creates a similar problem as changing font sizes. When changing the color of each item, the customized color the user has chosen earlier is not saved to a bar for easy access later. Users must note the particular color code such as “60b0f4” which is a type of pale blue and try to match the color code. I ran into this problem when trying to change each letter of a word into a rainbow theme. Each time I circled back to the same color, I had to try to match the same exact red, green, or whatever. Experimenting later, I found a loophole using the paint bucket feature which allows the user to highlight the items they desire to be the same color without having to match the color code. However, even though this is a solution, it is only a partial solution. The paint bucket feature will allow users to change an item to another color in its entirety but not individual letters of a word. Lastly, there was no upload option to add a user’s personal graphics that I could see but there is an option to get customized logos for $195+ in which the user is matched with a project manager that consults with the user.  User Guide Steps for getting started include searching for graphics, deciding on the text font, style, size and color and background color if desired (such as a blue background behind the text and graphics). Play around with the graphics using reflect, rotate, sizing, and coloring. Save your logo which takes you to a page to purchase the logo, save it for free by giving Logomakr credit, or saving the link provided at the bottom of the page for future edits and alterations. (Also, check out the screenshots below.) 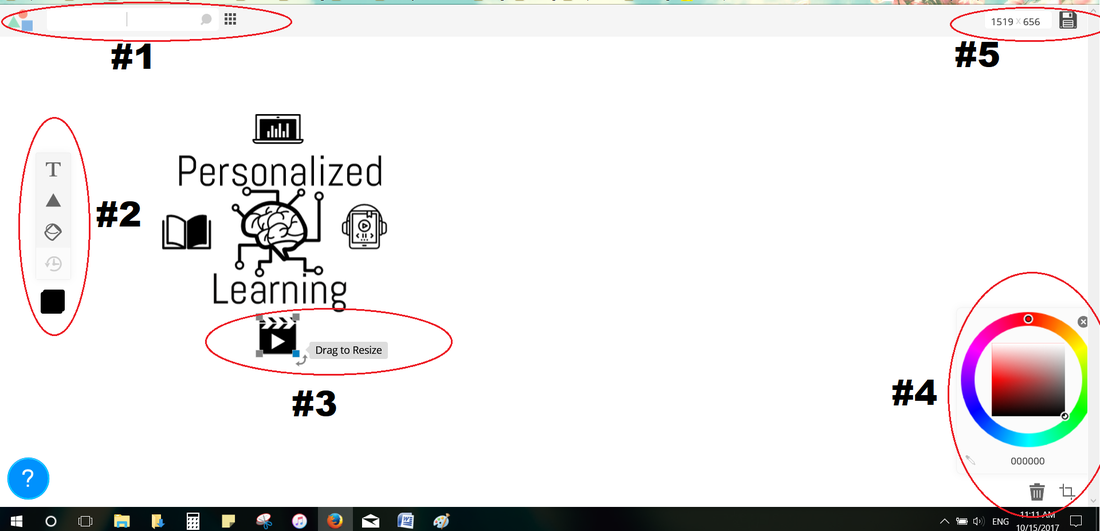  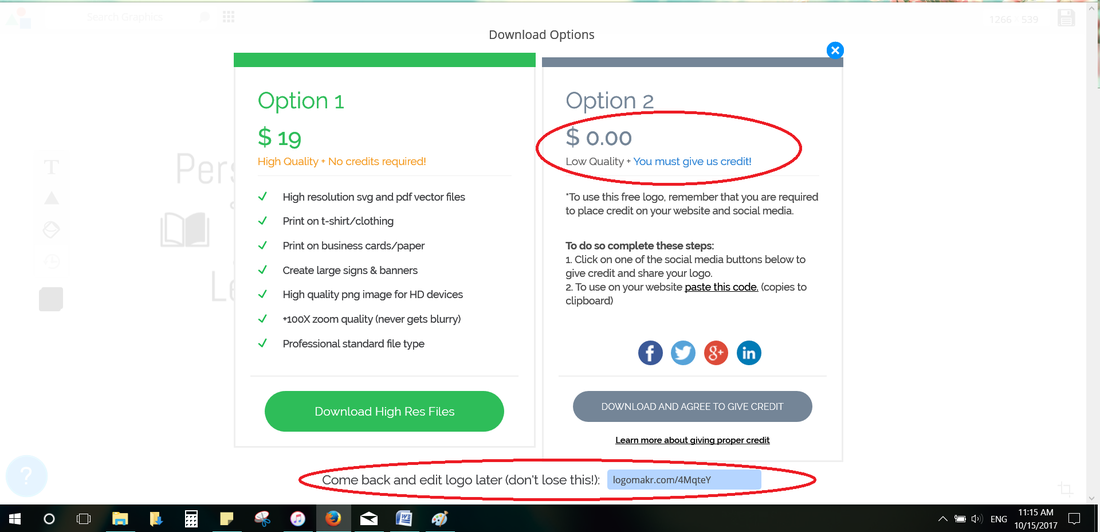 My Take on Transliteracy
Taken from the Transliteracies Research Project, "transliteracy is the ability to understand and communicate—i.e., to be “literate”—across all communication platforms, including sign language, speech, reading, writing, mass and social media." In the 21st century, there is no doubt that transliteracy has a very important place in the world and in turn—education. The ability to effectively understand and communicate is integral in both our private and professional lives. As technology advances and communication evolves, as an educator, I feel it my personal duty to teach transliteracy to my students. I need to know that my students are becoming increasingly proficient in using the different forms of communication to accomplish tasks. As my students progress into high school and college, they will surely be exposed to many new platforms of communication, whether it is Weebly, Blackboard, Zoom and so on and be expected to utilize them proficiently. My goal as a teacher is to prepare my students for the future and that includes teaching transliteracy, especially in the mathematics content. I believe that students in the 21st century have all the answers at their fingertips via the World Wide Web and if they can master how to navigate it and all other media (text, images, audio, or videos), they can tap into those answers for themselves. Transliteracy is needed to become autodidacts in this new information age. My wanting to transform my classroom so it can provide students a way to learn at their pace and feel included, I think, requires students become increasingly transliterate. In conclusion, transliteracy definitely plays a part in leveling the playing field if we want to get into talking about social justice and closing the achievement or opportunity gap. Those who are not transliterate will be at a blatant disadvantage. I am all for it, but what does teaching transliteracy really mean and what does it look like in the classroom? Questions About Transliteracy The definition of transliteracy seems pretty straight forward but it is a bit more difficult to imagine how teaching transliteracy would actually play out in the mathematics content area. What would a lesson look like? What tools would I need to train on before utilizing it? Are they compatible with my curriculum and standards? I wonder if that means I need to utilize fancy tech tools and introduce new platforms of communication into my classroom even if it may not offer any apparent advantages as compared to other means. Here are a few other questions that I have come across as I ponder the idea of teaching transliteracy. Does literacy in social media contribute to more learning in math? Or does it provide more distraction than benefits? In a race against time in my class and many math classes around the world, I worry that teaching transliteracy means spending abundant amounts of time on tasks that can be accomplished more speedily through a different mean. For example, I would like to have students create math video tutorials. I want to introduce different video making apps and tips for what makes a good tutorial video but is the extra time spent on this task worth it? Are their critical thinking skills in math increasing through this process? Is there more conceptual understanding and procedural fluency? That is a question I do not have an answer for but I hope to come closer to an answer as I progress through the Innovative Learning program. Influence of Transliteracy on Student Inclusion and Engagement I definitely believe that transliteracy teaching methods increase student inclusion and engagement as it may very well encompass technology that the students may already be aware of. It could possibly make the content more interesting and relevant to the student if the teaching methods are utilized correctly. However, I have definitely seen lessons that include transliteracy in math classes that do not engage students either so there are some things to consider when we talk about teaching transliteracy. It is important to understand how to effectively teach and utilize transliteracy. I do love the idea of allowing students to utilize YouTube videos and other media to support learning. I think that Khan Academy and various other platforms are valuable. Final Thoughts My final thoughts on transliteracy is whether teaching methods different from content to content and if it is important to teach transliteracy across all content areas? I have found that many platforms and apps align much better to Language Arts and whether gaining transliteracy skills in one class transfers to other classes. I do not want it to seem like I am pushing all the responsibilities to other content areas but I want to know if it is feasible in a math class. If so, I am willing to try it out! |
Nai Saelee
Middle school math teacher preparing the leaders of the future. Inspiring curiosity, creativity, collaboration Archives
December 2017
Categories |
 RSS Feed
