 Process In my journey in script writing, first, I listed out each component that would go into my video. I introduced problem and need briefly in various contexts, some statistical data as evidence, the objective of my capstone, key features and components of capstone providing information about personalized learning, and why students and educators should visit my capstone, describing the benefits of implementing personalized learning with the use of digital tools. Second, I make sure that the sentences in the script are concise but impactful. This ensures that when my images pop up on screen that the script flows smoothly with the image and transitions at a good pace rather than having really long sentences for each image. Third, I wrote a short blurb about what kind of B-Roll image(s) or video(s) I could use for each of the components such as an image of students holding cards up that indicates whether they are meeting proficiency or not in red and green that pans across the whole class or a graph/table or image of the statistics and so on. Fourth, I time myself reading the script to make sure that it will only be 90 seconds long and make any changes necessary.  Challenges In producing my capstone project video script, I found out that I had to become a more concise writer especially if I am limited to 200 words or the equivalent of a 90 second video. I struggled with what information was relevant and necessary versus what was extraneous, redundant, or could be information I add to my other pages on my capstone. My problem is I always have too much to say and I need a second pair of eyes to tell me what I can cut out because in my eyes, I feel like my intentions or message may be unclear if I cut out anything. I also learned that for the objective of this video, it is better to use less flowery language and be more direct so that my writing is more concise and not unnecessarily wordy but my meaning is still understood. For the problems I encountered, I used the critical friends protocol where I ask someone to proofread my work and give me constructive feedback. Getting that outside perspective is very important for improvement because I know very well what my intentions are in my head, it is hard to tell if my work is reflecting what is already in my head. In the end, I asked my boyfriend for his advice, continuously proofread my stuff, and did a lot of revisions, editing, and omissions.  Video Editor
In the end I chose to use none of the suggested video editors. I will be using Adobe Spark because I am already familiar with the features of it and how to navigate. The video you download is also in the right format. One of my favorite features of Adobe Sparks is that it allows me to record and re-record each slide separately as many times as I want so I do not have to record everything in one take. I remember creating my 8 minute 30 second video about critical thinking for one of the classes and I had to record everything in one take and if I messed up, I had to record it all over again. At the end of it my voice and throat were shot. You can upload images that you want as well as any videos you want and it gives you music tracks to choose from. I will be using different image editors to create B-Roll images for my video. I like to use MS Paint, Canva, Logomakr, and even MS PowerPoint for editing images.
3 Comments
 Logomakr Review In creating my logo, I experimented and ended up choosing to use Logomakr. There were a few pros and cons, but more pros. I think the ease and simplicity of the tool really appealed to me and there is also a way to get a low quality version of it for free just by crediting the website. High quality versions are also available and are just $19 which is comparable to many of the other logo makers around.  Pros First, I will discuss the pros. The Logomakr website is very user friendly and offers up a large range of graphics to choose from. There is also a wide range of fonts and styles in terms of choosing text. Users can choose to change the color of any graphic or text simply by dragging the cursor over the color the user want and customize it to be brighter, darker, and so on. Users can also rotate, reflect, stretch, or squeeze graphic and fonts by clicking and dragging. There is a feature that allows the user to see grid lines for easy alignment of graphics and texts when dragging the item around, the lines will appear. Other general features include shapes, paint bucket, undo, trash, and cropping. Finally, there is a FAQ page, video tutorial, and a professional custom logo option starting $195 or $299 for UNLIMITED revisions which would normally cost thousands of dollars.  Cons and Loopholes There were a few cons. First, font sizes are not numbered such as size 24 font. Users may drag the corner of a text or graphic to enlarge or decrease the font size but size is generally measured and given in pixel height and width. This may be a given for graphic designers but every time the user wants to add new text and match the original size, they would have to match the pixel height of the original. The loophole around that is to highlight the text box, copy, paste, and edit the text. Changing the color of an item is easy enough but to change each item to the same color creates a similar problem as changing font sizes. When changing the color of each item, the customized color the user has chosen earlier is not saved to a bar for easy access later. Users must note the particular color code such as “60b0f4” which is a type of pale blue and try to match the color code. I ran into this problem when trying to change each letter of a word into a rainbow theme. Each time I circled back to the same color, I had to try to match the same exact red, green, or whatever. Experimenting later, I found a loophole using the paint bucket feature which allows the user to highlight the items they desire to be the same color without having to match the color code. However, even though this is a solution, it is only a partial solution. The paint bucket feature will allow users to change an item to another color in its entirety but not individual letters of a word. Lastly, there was no upload option to add a user’s personal graphics that I could see but there is an option to get customized logos for $195+ in which the user is matched with a project manager that consults with the user.  User Guide Steps for getting started include searching for graphics, deciding on the text font, style, size and color and background color if desired (such as a blue background behind the text and graphics). Play around with the graphics using reflect, rotate, sizing, and coloring. Save your logo which takes you to a page to purchase the logo, save it for free by giving Logomakr credit, or saving the link provided at the bottom of the page for future edits and alterations. (Also, check out the screenshots below.) 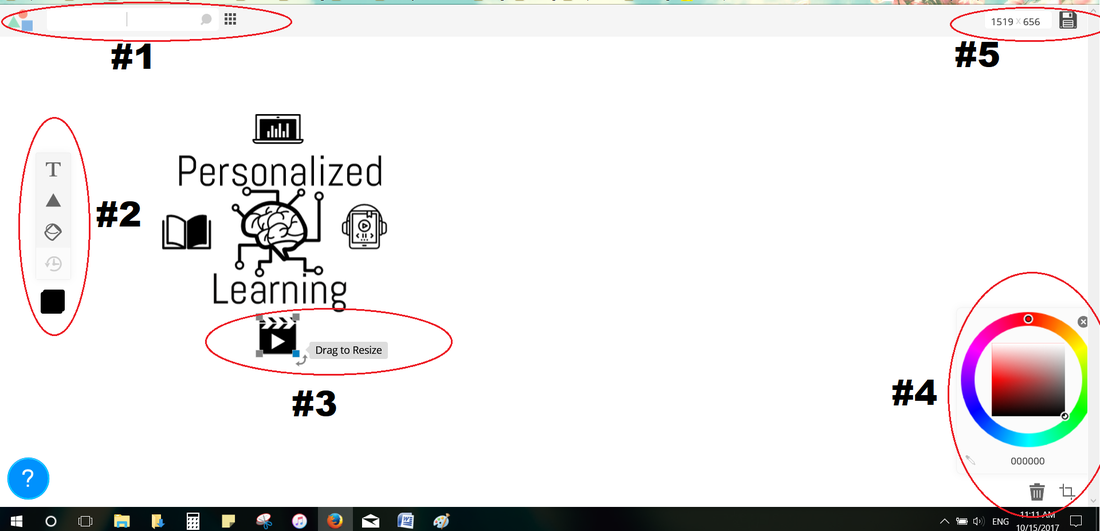  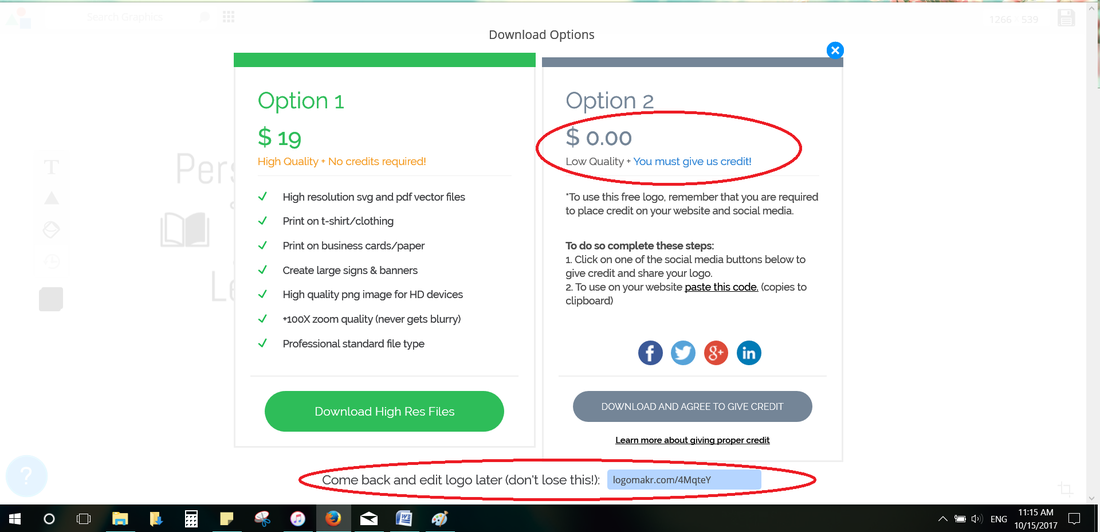  Educational Technology Mission Statement At American Canyon Middle School we do not have an educational technology mission statement nor is there anything explicitly mentioned within as observed by the following, “Inspiring and preparing students today for the possibilities of tomorrow by instilling the 4 “C”s (Critical Thinking, Communication, Collaboration & Creativity) in a respectful, safe, collaborative community by utilizing clear expectations and focusing on strengthening relationships.” Although our school does not mention educational technology usage within our vision statement, American Canyon Middle School’s vision and goals are aligned with the Napa Valley Unified School District vision and goals which states, “Our mission is to transform lives by instilling 21st Century skills and to inspire lifelong learning.” Under this statement and in more detail, the NVUSD website describes the district as a student-centered and 21st Century school district that emphasizes instruction that enables student ownership of their learning, use of technology to enhance learning, and ensuring student active participation and engagement in personalized educational experiences. There is also emphasis on technology-rich classrooms that engage students in relevant, rigorous inquiries aligned to Common Core standards. Specifically, there are three goals: (1) preparing all students for College and Careers, (2) providing equitable access and opportunities to close the achievement gap, and (3) instilling 21st Century skills. Under each goal, there is emphasis on technology. Under the first goal, STEM, computer science, coding and robotics are emphasized. Under the second goal, use of technology to support differentiated instructions for intervention is emphasized. Under the last goal, technology is regarded as a teaching and learning tool used to increase student engagement and provide authentic real-world tasks.  NVUSD is a BYOD (bring your own device) district which allows students to bring and use their own personal electronic devices at school. Students may use their devices in the classroom to access and save information from the Internet, collaborate with other learners, and utilize productivity tools available to them. The purpose of the BYOD program is to help students practice responsible use of technology at school as well as learn ways to use technology for productivity, time management, research, and creativity to become responsible digital citizens part of the global online community as well give students authentic experiences to build their 21st Century skills. As part of NVUSD, American Canyon Middle School is also a BYOD (bring your own device) school. Devices are provided to students who do not own their own device. Under the BYOD technology guidelines, devices are to be used appropriately and responsibly as proper digital citizens. Violations of these policies will result in confiscation and may be subject to disciplinary action or reported to local authorities in cases of serious offenses. In summary, the educational technology mission statement encompasses the goal to infuse technology into the classroom to prepare students for College and Career in the 21st Century which means utilizing technology to engage students, provide opportunities to practice the 4 C’s (or 6 C’s—communication, collaboration, critical thinking, creativity, character, and citizenship) through authentic real-world inquiry, and to differentiate, remediate or advance learning. I think that these goals are necessary to prepare students for the jobs of tomorrow and they align with my own personal practices.  Mission Statement and My Personal Practices Since my first year of teaching and now in my fourth year of teaching, infusion of technology has significantly increased probably ten-fold. Implementing technology into my mathematics classroom was not easy. Knowing that I wanted to incorporate technology for richer learning, collaboration, creativity, communication, and critical thinking did not help me with the actual implementation. Initially, I did not know how to create lessons that incorporated technology in a way that enhanced learning mainly because I had no exposure to the kind of tech tools available to me in my content area. I wondered what tools were out there that aligned to my curriculum and content standards. I never felt like I had enough time to explore or learn about anything well enough to implement. Moreover, I was afraid that the tools would be more of a distraction or liability than an asset. Those fears still exist but knowing how technology can fit into my curriculum has allowed me to infuse my classroom with more engaging lessons and opportunities for my students to practice their communication and collaboration.  The Mission Statement and My Capstone Goals The district technology goals align with the goals of my capstone perfectly. The goals of the district emphasize differentiation, remediation, and enrichment of student learning as well as engagement in personalized educational experiences. My capstone is about personalized learning which at the heart of it is about Competency-Based Learning (CBL)--helping students master the content at their pace and in the way they learn best. I am infusing my research of the benefits of metacognition and what I have learned about personalized learning to create my capstone. I would like to see how digital assessment tools that provide hints, videos, feedback can help students master content and with reaching their personal learning goals.  How to Support This Mission To support this mission, in the future, I would like to focus more on using data from digital assessments to inform goal-setting for my students. I want them to be more aware of the process or goal-setting which would include helping them figure out what content they will need to master (the standards), creating a SMART goal based on where their learning level is at, and planning how they will go about accomplishing that goal. Moreover, last year I did not spend much time on digital assessments as a remediation tool and would like to pursue this more as I cannot provide one-on-one support as much as I would like. For example, I might have students work on Khan Academy 20 minutes a day or every other day or assign it for homework, mandating that they use the videos or hints when they are stuck. I can also create my own EdPuzzle videos that embed metacognitive questions, helpful hints, and videos as support. For now, this is my answer but I am sure that my solution will continue to evolve as I continue to learn and grow like that of my students.  |
Nai Saelee
Middle school math teacher preparing the leaders of the future. Inspiring curiosity, creativity, collaboration Archives
December 2017
Categories |
 RSS Feed
